ReShade 3.0 guide for newcomers
- Marty McFly
- Topic Author
Less
More
9 years 7 months ago - 7 years 3 months ago #1
by Marty McFly
ReShade 3.0 guide for newcomers was created by Marty McFly
As still questions are popping up (not only here, also on my facebook page) how to use ReShade 3.0 and what to do with presets from TheLazy, hope I can give some guidance with this.
What's different to 2.0
ReShade 3.0 is obviously a whole lot different. Main features is that not all shaders run over the ReShade.fx (Framework is also essentially "one file" as every file in the folder structure is included into the main ReShade.fx), now you can freely name your fx files and most importantly, put them into any folder you want, you just have to specify where ReShade has to look for them.
That's where lies the most obvious difference, you can configure ReShade with a new ingame UI (which can be brought up by default with Shift + F2 in case you missed the big ass notice at the start) where you can control all sorts of things, later more.
Installation
UI options explanation
Use SweetFX 2.0 with ReShade 3.0 (temporary solution)
Although I can understand that crosire wants people to use the newest ReShade version and including old versions will cause people to ignore the update, only distributing the 3.0 build renders all SweetFX configs on TheLazy.net useless until all SweetFX shaders are ported to the new repo. In case you have SweetFX 2.0 still around on your PC, you can use the build like this (method should also work with the Framework and MasterEffect but I did not test this, feel free to do that on yourself though):
(under construction)
What's different to 2.0
ReShade 3.0 is obviously a whole lot different. Main features is that not all shaders run over the ReShade.fx (Framework is also essentially "one file" as every file in the folder structure is included into the main ReShade.fx), now you can freely name your fx files and most importantly, put them into any folder you want, you just have to specify where ReShade has to look for them.
That's where lies the most obvious difference, you can configure ReShade with a new ingame UI (which can be brought up by default with Shift + F2 in case you missed the big ass notice at the start) where you can control all sorts of things, later more.
Installation
- Download the installer on the main page.
- Install by selecting the game's executable (if you are not sure which API to select, check the "Games" section of this site)
- The example shader repo is never a bad choice, it supplies you with a set of new and old shaders ported to new format.
- The file structure in the game folder (where the game's exe is) is now the following:
- ReShade DLL (can be dxgi.dll, d3d9.dll, opengl32.dll)
- Folder "reshade-shaders" with subfolders "Shaders" and "Textures"
- After the game started, press Home (Pos 1 on german keyboards) to open the menu. Follow the tutorial and read carefully.
- To make configuration easier, head over to the Settings tab and switch Input Processing to "Block all input when overlay is visible". That way you prevent stuff going on in the background or when your mouse leaves the overlay.
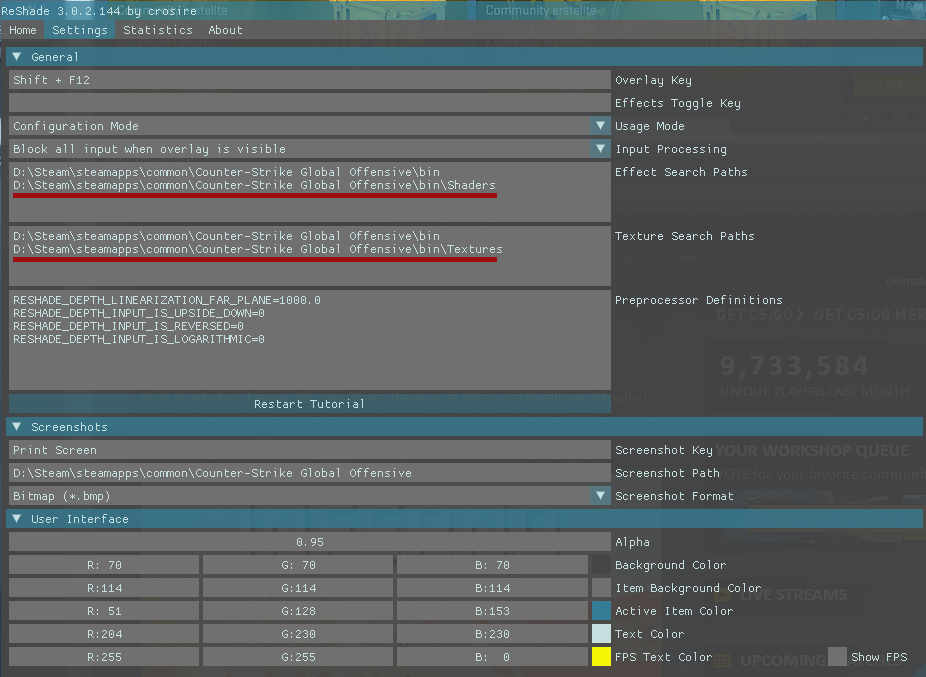
- If no shaders show up in the main tab, you have to go to the Settings tab and tell ReShade that it has to look for Shaders and Textures in the respective folders (<game dir>\reshade-shaders\Shaders and \Textures). Click on "Reload" on the Home tab. Following picture shows how I did it in my CSGO folder. Note that this is specific to the shader repo from Github, you can arrange the shaders how you want, it's just that the Repo has this folder structure.
Warning: Spoiler!
- You can now enable effects in the upper part of the Home tab, the variables to configure those are found in the lower area, conveniently sorted and equipped with a search feature. I think you will get used to this in an instant.
- If you use depth based effects of some sorts (MXAO, DOF, even SMAA depth predication), make sure to configure the preprocessor definitions according to any notes found in the "Games" section of this site. If none are there (and support set to "perfect" then leave them as they are. If not, the troubleshooting section of the forums is your place.
- Shader compilation will take some time, same goes for every time you force recompile by alt-tabbing or restarting game. You can cut that short with 2 ways: delete all shaders you know you will never use (move them into a subfolder for example) or once you are satisfied with your config and don't want to edit it now, enable "Performance Mode" in Settings tab. This will render all config variables static (=not editable in config) but speed up the compilation a LOT.
This is because things like a feature toggle requires the compiler to evaluate both choices, also constant folding (simplifying equations etc) is now possible. Hence the fps will probably be better as well. If you want to edit again, just switch to Configuration mode again.

UI options explanation
- Home
- config dropdown menu: that's where you can switch between your config files. The tutorial probably guided you to create a new config.
- Shaders section: that's where all loaded shaders are listed. In some rare cases one file might have 2 features you can toggle separately, but mostly it just tells you which effect you enable.
- Config parameters section: that's where you can configure the shaders, conveniently sorted by file. All changes made are saved in the current config automatically, so in case you want experient but fear breaking your current config, add a new one (which is a copy of the current one by default).
- Settings
- Overlay key: pretty straightforward, the key combo that brings up the UI. Shift + F2 by default. Click in the box and press your desired combo.
- Usage Mode: configuration mode is default mode. Performance mode disables all realtime editing features but allows for faster compilation and shader performance as the compiler can optimize a lot more.
- Input processing: that's where you can specify what should happen in the background. I personally find "Block all input when overlay is visible" the best choice because it fully prevents you from doing any sort of shit in the background by accident.
- Effect/Texture Search Path: as explained above, that's all folders where ReShade looks for shaders. You could create a united folder for all games you use by putting the files into one directory and use the same one for all games with ReShade 3.0, you're not required to use the game folder for that!
- Preprocessor definitions: those are options that can't be toggled at runtime and changes require "Reload" on Home tab in order to show their changes. By default, only the depth buffer related config params are there (see "Games" section of reshade.me for game specific information). However some shaders have own definitions that don't show up here, you can add them manually. If any loaded shader contains "#define myvar 5" you have to put myvar=5 into the preprocessor defs. The #ifndef etc around all those vars inside the shaders are just there so you can override the current hardcoded parameter without declaring it twice and breaking the shader.
- Restart tutorial: in case you clicked OK all the time without reading or just don't remember something, this starts the tutorial again (duh).
- Other options here are self-explanatory.
- Statistics: that's where you can see a lot of info, fps, how much performance ReShade drains and so on. The counter in milliseconds is the amount of time a shader needs to run every frame. If your game is running at 40 fps without ReShade, its frametime is 1/40 second = 25ms, the time your PC needs to render one frame. Now the ReShade technique frame time adds on top of it. If we use some exaggerated numbers, say one technique has 15ms, that means your PC needs 25ms + 15ms = 40ms = 0.040s per frame with ReShade enabled, resulting in 1/0.040 = 25 fps. That way you can directly see which effect drains your fps away and which one runs almost for free. That's the reason why the fps hit of an effect is highly depending on the current fps you have, because any effect applied on a game that runs with 400fps will cut those in half (because the frame time of any effect is large compared to the one of the default frame), when it's only taking a couple of fps when your game runs with 60 by default.
- About: Gives your information about ReShade, its author, the used open source libraries etc.
Use SweetFX 2.0 with ReShade 3.0 (temporary solution)
Although I can understand that crosire wants people to use the newest ReShade version and including old versions will cause people to ignore the update, only distributing the 3.0 build renders all SweetFX configs on TheLazy.net useless until all SweetFX shaders are ported to the new repo. In case you have SweetFX 2.0 still around on your PC, you can use the build like this (method should also work with the Framework and MasterEffect but I did not test this, feel free to do that on yourself though):
- Install 3.0 as shown above, but don't use the shaders from the repo. In case you already got them ,just delete them. ReShade 3.0's shader system would technically allow using all of them together but in case you just want to fire up a preset and you're not used to using ReShade in general, this just creates more confusion. To delete them, delete the "Shaders" and "Textures" folder where you installed ReShade.
- From SweetFX 2.0, put the "SweetFX" folder and the Sweet.fx into your game folder where the ReShade DLL is. Do not copy over the ReShade.fx because ReShade 3.0 will load both Sweet.fx and ReShade.fx (which in turn loads Sweet.fx and all that behind) and basically applies SweetFX twice and cause major confusion in the Home tab with the settings.
- Start the game. ReShade 3.0 (even unconfigured) will pick up the Sweet.fx in the game directory and a single technique "SweetFX" will be visible (if not, reload).
- Configure SweetFX as usual, the configs from TheLazy come into the SweetFX folder, everything as usual. There might be some compiler warnings (not errors so all is fine for you) because the file system changed or something (at least I get those on GTA V but I also use a deprechated SweetFX 2.0 build). Just ignore those.
However you will not be able to configure SweetFX 2.0 in realtime as the files are not ported to the new format and do not make use of any UI variable annotation or support using preprocessor items in the UI! In the future when all SweetFX shaders are ported, you can do that, but then you'll have to adapt all config variables from old SweetFX config format to new ReShade ini file format.
(under construction)
Last edit: 7 years 3 months ago by crosire. Reason: Fixed UI key
The following user(s) said Thank You: crosire, JPulowski, angellman, piltrafus, Kuniyo, Qsimil, Sunesha, Chilace, Roman.860
The topic has been locked.